How To Use Search Console (Google Webmaster Tools) – The Beginners Guide
How To Use Search Console (Google Webmaster Tools) – The Beginners Guide
 |
| How To Use Search Console (Google Webmaster Tools) The Beginners Guide |
Getting traffic on your site is a very important thing. There are many ways which you can use to drive more and more traffic to your site, but the best method to drive organic traffic is organic sources or says search engines like Google.com. Yes, search engines are the best sources to get free & organic traffic on your site.
For getting traffic from the search engines like Google.com you must have to index you site in Google’s index so that Google can understand your site and can display search results from it, for easily & quick indexing of any site, Google has a tool called ‘Search Console’.
Search Console is also known as ‘Google Webmaster Tools’ but the term webmaster tools are not used by Google now in May 2015 Google has updated the name of Webmaster Tools to Search Console. Search Console is used by a huge number of people including web designers, SEO experts, marketers, professional Bloggers & website owners, app developers and many others.
Let me clear what Search Console is? Search Console is a free service provided by Google used to check the index status of your site(s) and to optimize visibility of your sites. Search Console has many tools in it which can be used to do following tasks:
- Submit & check the sitemap.
- Immediately indexing new pages.
- Lists the pages either internal or external that are linking to your site.
- Discover the pages of your site which are blocked by your robots.txt file.
- Edit & change the robots.txt file.
- The most popular keywords of your site.
- Setting the preferred version of your site’s URL in the search results (For your understanding: Show www.example.com in search results over example.com)
- Demoting the Sitelinks which are appearing in the search results. (When you search for Shout Me Loud on Google it shows the main site with some more result like About, Income reports etc.)
- Important information such as any kind of Malware on your site or any security breach.
- Get a list of links or URLs which Google bots has faced difficulty while crawling.
- There are much more tools in the search console which you can use.
Adding and verifying your Site(s) in Search Console (Webmaster Tools)
For taking the advantages of Search Console you must have to add and verify your site(s) so that you can easily index your new pages and take other actions. Adding a site in search console is not a harder task but verifying the ownership is somehow difficult that’s why Google has many options to verify your ownership of a site.
Once you successfully verify your site in the Search Console you will start getting information about your site in a short time. The verification process is for the security of your site’s data as Google never gives the personal details of its any user to unknown persons.
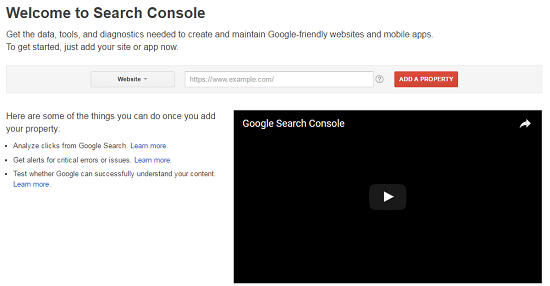
Login to your Google Account if you don’t have one then you have to sign up for one. Go to the Home Page of Search Console.
Enter the URL of your site or which you want to add in search console account and click on the ‘Add Property’ button.
 |
| Adding and verifying your Site(s) in Search Console (Webmaster Tools) |
You have successfully added your site in the Search Console but you have also to verify the ownership of the site which you added so that you can access all the features.
There are many methods to verify the ownership of your site these are as follow;
- Link Search Console to Google Analytics
- HTML tag
- Google Tag Manager
- Domain name provider
- HTML file upload
Verifying ownership by Linking Search Console to Google Analytics for Blogger
 |
| Verifying ownership by Linking Search Console to Google Analytics |
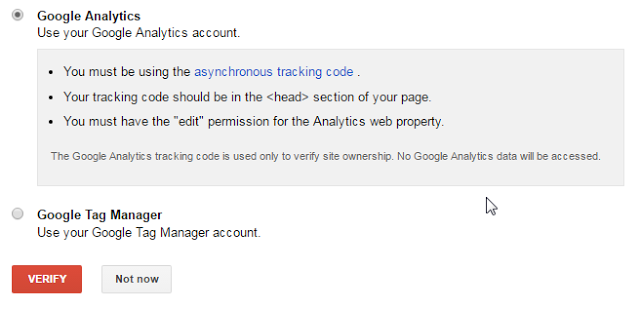
Verifying the ownership of your Blogger blog for Search Console by linking the Google Analytics is the best and easy method. To use Analytics to verify the Search Console there are following requirements.
- You must be using the asynchronous tracking code on your site.
- Tracking code must be in the Head (<Head>) section of your blog’s HTML.
You must have Edit permission in the Analytics property you are going to use.
Login to your Google Account associated with Analytics account and go to the Dashboard of Analytics.
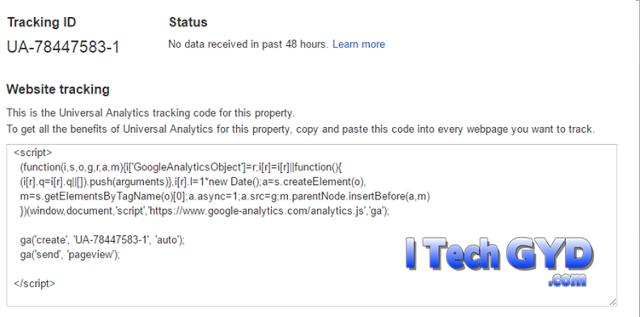
Click on the Admin tab and then Tracking Info under the Property column. A new page with tracking ID and the asynchronous tracking code will be displayed. Copy the asynchronous tracking code from there.
 |
| Verifying ownership by Linking Search Console to Google Analytics |
Go to your Blogger blog which you want to verify in Search Console. Select the Template from the menu.
Click on Edit HTML button to open your blog’s template in Blogger’s template editor.
Press CTRL + F in the editor, enter <Head> in the search box and press enter key.
Paste the copied asynchronous tracking code just below the <Head> tag. Click on the Save Template button.
Go back to the Search Console and click on the Verify button under the Link to Analytics options.
Remember: Once your site is verified using this method don’t remove the Google Analytics Code as it may also cause your site to became unverified.
Verifying ownership by Linking Search Console to Google Analytics for all sites using Google Analytics
If you are already using Google Analytics for your site or blog based on any platform then Google Analytics is the easiest and best way to verify the ownership of your site in Search Console. The first thing you need is asynchronous tracking code in the Head (<Head>) tags of your site’s HTML. Normally asynchronous tracking code is placed in the Body (<Body>) tags of HTML sites so move the asynchronous tracking code from Head tags to Body tags first.
Go back to the Search Console and select Verify this site under the Manage Site option. Look for Google Analytics option, normally it is in Recommended Method but it may vary with the platform of your site. If it is not in Recommended Method then look for Alternate Method you will find it, select Google Analytics and click on Verify button.
Verifying ownership by Adding HTML tag for Blogger
Verifying the ownership of your Blogger blog using HTML tag is a very easy method. We will add an HTML Meta tag in the template or HTML of our blog’s template.
Select HTML Tag option from the Search Console’s verification page if it is not on recommended settings then click on the Alternate tab and select the HTML Meta tag option.
 |
| Verifying ownership by Adding HTML tag |
Copy the Meta tag and login to your Gmail account associated with your blog which you want to verify.
Select the blog which you want to verify go to Template and click on Edit template button.
Paste the copied HTML Meta Tag after any Meta tag at the beginning of template’s coding, if you do not find any Meta tag in your template then paste the copied HTML Meta tag after the closing </title> tag.
Click on the Save Template button go back to Search Console and click on Verify button selecting the HTML Meta tag options.
Note: This method is same for all other type of sites which has HTML working experience.
Verify ownership using Google Tag Manager for all kind sites
 |
| Verify ownership using Google Tag Manager |
Google Tag Manager is the best method for all those site owners which are already using Google Tag Manager for their sites. But if you are not using Google Tag Manager then you go to the homepage of Google Tag Manager Signup for Google Tag Manager with your site’s URL. Copy the code from Tag Manger and paste that into your site’s HTML after starting Body tag (<Body>).
Once you have put the Google Tag Manager code on your site come back to Search Console’s verification page select Google Tag Manager verification option and click on the Verify button. You can find Tag Manager verification option in Alternate methods tab if it is not present in Recommended methods.
Important Notes:
- You must have “View, Edit, and Manage” permissions enabled in your Google Tag Manager account.
- Do not remove the Google Tag manager code from your site after verification, it may cause your site to be unverified.
Verify ownership of site using Domain Name Provider
 |
| Verify ownership of site using Domain Name Provider |
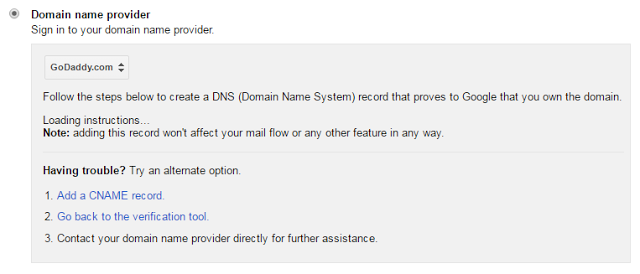
Domain Name Provides is the domain providing company from where you had bought the domain or hosting for your site. Choosing this option for big sites is the best option as it proves that the person is real and it verifies Google not only the main domain also sub directories and sub domains of your site.
Go to the verification page of Search Console select Domain Name provider option you can find it in Alternate methods tab. Choose the option and click on Verify button.
After clicking on the Verify button a list of companies which provides the facility of Domain and hosting will be listed. Select your provider company from the list, for example, mine is Go Daddy if your provider is not listed then select OTHER option then you will be given with some instruction for creating a DNS TXT record or CNAME follow the instructions and create a new record finally verify your site in the Search Console.
Verify ownership of your Site by uploading File
 |
| Verify ownership of your Site by uploading File |
This method is only applicable to those sites where HTML files can be uploaded. If your site has the facility to upload HTML files to the root directory then you can use this method to verify your ownership.
On the Search Console, verification page select Upload HTML file option you can find it in Alternative methods tab. When you select file upload method Search Console will ask you to download a file just download the file and upload to your site’s root directory or the location specified.
Note: Do not change the contents of the downloaded file even if you change the name of file Search Console will not be able to verify your ownership using this method so do not change the name or its contents.
After successful uploading of file come back to the Search Console’s verification page and click on Verify button if you have uploaded the file correctly then Search Console will verify your ownership of you site.
Once your site has been verified do not remove or delete uploaded file from your site it may cause your site to become unverified.
Adding a sitemap for your site in Search Console
Submitting a sitemap is not mandatory but it is better practice for indexing your whole site in the Google index that’s why it some SEO experts recommend it. By submitting a sitemap you do the Google’s job easy and Google also rewards you by giving you more and more organic traffic as sitemap helps Google to determine the pages of your site so they can index them easily and show your pages in the search results.
- Sitemap is submitted in the XML format and cannot contain more than 50,000 URLs, if you exceed this limit then you have to divide your sitemap into different parts and submit them.
How to Submit a Sitemap in Google Search Console
Before you submit a sitemap for your site your site must be correctly added and verified in Google Search Console if you do not have done this them first do this from the above site verification guides.
To submit a sitemap first you need the sitemap you can create your own sitemap from the following guides.
To create your own sitemap you just need to go the Blogger Sitemap generator or other blog services go to XML Sitemap Generator type the URL of your site’s homepage in the respective field and click on the Start button. But if you are using the Yoast SEO plugin for your blog or website then you can find your sitemap by putting this sitemap_index.xml at the end of your site’s homepage URL i.e. Yoursite.com/sitemap_index.xml.
Once you have the sitemap of your site Go to the Search Console Dashboard and select the site for which you want to submit the sitemap.
On the Left, menu panel click on the crawl option and select the Sitemaps.
Sitemap page will load, click on the Add/Test Sitemap button at the top right corner of the page.
A box with your site’s homepage URL will be displayed enter the sitemap of your site which you had created.
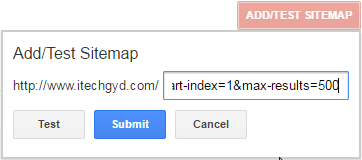 |
| How to Submit a Sitemap in Google Search Console |
Note: Do not enter the URL of your site with the sitemap. And finally, click on the Add Sitemap button.
That’s it you have successfully submitted the sitemap for your site.
Linking your Search Console Account with Google Analytics
Google Analytics and Search Console or two different services of Google they may seem same as both tells about the site but there are many differences in them, normally beginners thought Search Console is best but they do not know both the services are important.
Differences between Google Search Console and Analytics
Google Search Console is for internal information such as indexing your site, checking which site is linking you, how many visitors you are getting, how many click your site have got from search results, is there any malware on your site, the most popular keywords of your site etc. while Google Analytics gives more information about your visitors such as from where your visitors are coming, what they are searching on your site, how many time they have spent on your site, location & language of your visitors, interest of your visitors, comparison between the page views of two dates etc.
There are also some differences in the algorithms of these two products so they do not use the same data in the same way that’s why you can see some difference in the reports of these products. Linking these two services provides the best results and you can get most out of the information provided by the Google Analytics and Search Console.
Let’s link the Google Analytics and Search Console with each other.
Login to your Google Account and go to the Search Console’s Dashboard.
Click on the website (Property) you want to link with your Analytics Account.
Look for a gear icon in the top right corner and click on it. And select the fourth option “Google Analytics Property”.
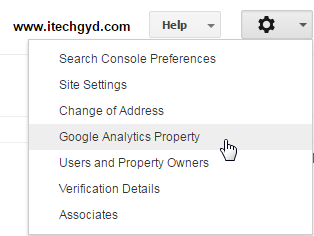 |
| link the Google Analytics and Search Console with each other |
If you have more than one Analytics Properties then a list of Analytics Account will be displayed select the Analytics Account (Property) you want to link with your Search Console account and click on the Save button.
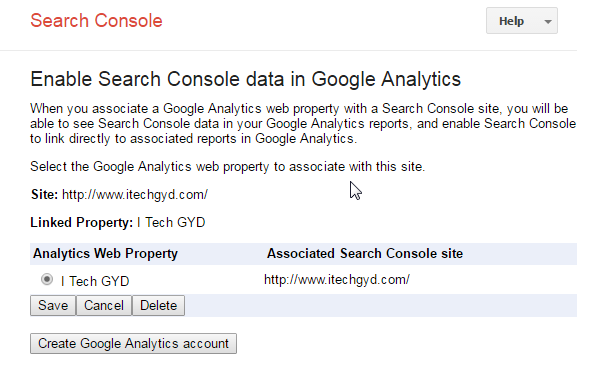 |
| link the Google Analytics and Search Console with each other |
That’s it you have successfully linked your Analytics and Search Console account. Now you will get the best reports for your site.
Introduction to all Tools and options of Search Console
When you have successfully submitted and verified your site in the Search Console the first page that will be loaded on your computer screen is the Dashboard of Search Console. Dashboard shows the verified and non-verified sites for example if you have added two sites one is verified and other is not then it will show both sites, now if you want to get details about your verified property then click on the site and a new page will be displayed that will be the Dashboard of your verified property which has many useful tools.
The dashboard of your verified property gives you a rough overview of your sites such as Crawl Errors, Search Analytics, and Sitemaps. On the left side, there is a menu called Dashboard of selected property. This dashboard has all the tools and options which you can use to optimize your site in Search Console.
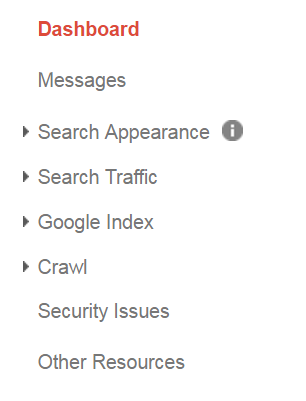 |
| Dashboard of Search Console property |
Messages
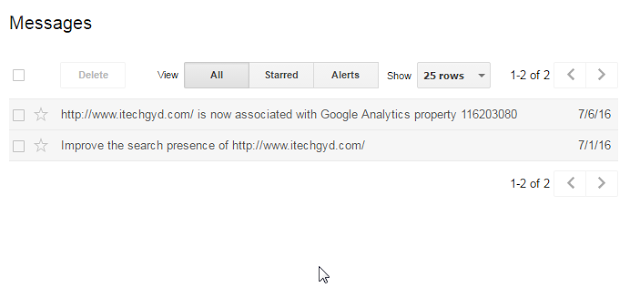
The first option in the Dashboard of Search Console is the Messages here you will receive important messages related to your verified sites.
When you submit & verify a new site Search Console sends you a message with some instructions to improve the search presence of your site. Click on the Messages, open the newly received message from the Search Console. It has some tips to help you to get most of Search Console and maximize your search preferences. There are some actions in the message which you should take for your site. There are below.
 |
| Messages |
- Add a Site: This option says to make sure you have added all variations for your site as separate Search Console properties this includes HTTP, https, www and non-www variations.
- Set Preferred Version: You can select either your site will show with www or without www in Google Search results.
- Choose Country: If you want to target your audience in a specific country then you can use this option, it is mostly used by e-commerce sites.
- Manage site users: If you want to give access your Search Console account to other people such as your friends, co-workers etc. then you can add them to your Search Console account using this option by giving different access levels.
- Submit a sitemap file: We have already discussed on submitting sitemap in Search Console, sitemap helps Google to understand about your site and how to crawl your site.
- Learn how to use Search Console: Google creates documentations for all its products in the same way Google has created one for Search Console you can also learn about Search Console from Google’s documentations.
Search Appearances
Search Appearances has many useful tools which can be used to optimize the search appearances of your verified sites. Click on the round question mark (?) icon at right side of Search Appearances option an example of the page of Search Engine Search Page will be displayed with each element which is shown in the Google Search Results. Like below picture.
Now click on each element of example page to read the instructions for about “how to influence” that element. There is also a Learn More link at the end of every line which you can click to open full instructions by Google.
Structured Data:
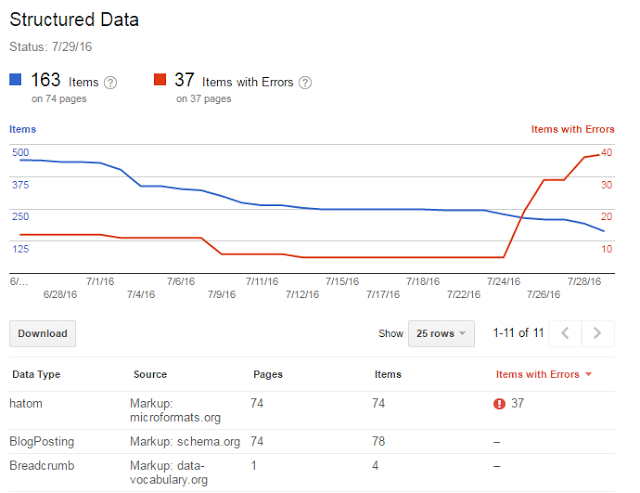
Structured Data tool is an awesome tool for informing Google about your pages and information on your pages and how should Google display it in Search Results. You can add rich snippets for your Google search results it includes rating start etc.
Structured Data has information about all the elements that Google found on your site besides this it also displays any errors it found while crawling your site, click on any Data Types to see which URLs contain a particular markup and when that markup was detected.
 |
| Structured Data |
Click on any URL listed to see further information about that specific URL. There is also a tool called Structured Data Testing Tool to see how your page looks in live search results to use this tool click on Test Live Data.
Data Highlighter:
Data Highlighter is a point and clicks tool which you can use to highlight various parts of your web pages and tell Google how to display that particular web page in search engine results page (SERP). You can also say it an alternative to Structured Data tool. For using this tool you do not have any need to install any script or codes on your site’s HTML you just need to set the Data Highlighter and it automatically tags similar elements.
For using this amazing tool click on Start Highlighting button under the Data Highlighter option. Enter the URL which you want to highlight, Select type of URL you want to highlight, Click on Tag just this page and finally click on OK button.
Video Credits Goes to Google Webmasters (YouTube Channel)
Now your selected URL will be loaded select the Title of your web page and mark it as Title, Select the image and mark it as Image, Select author’s name and mark it as Author and select the published data and mark it as Publish data. Mark all the other tags in the same way and click on Published button. Now you have to wait until Google Crawls your site again once it is crawled you can also Un-publish it at any time.
HTML Improvements:
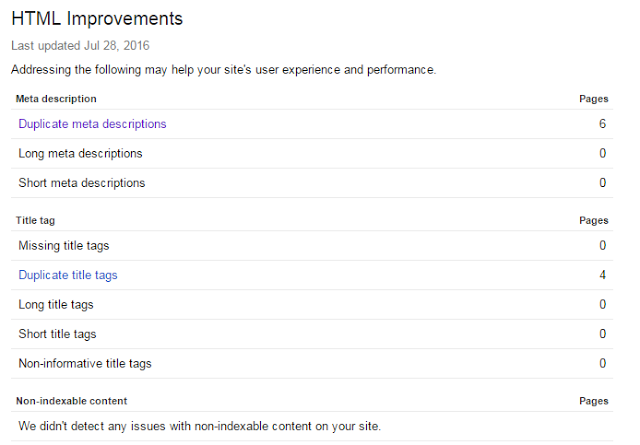
When Google crawl your site it also keeps on detecting potential issues with your contents such as duplicated meta descriptions, duplicated title tags or missing contents etc. Normally Google does not detect such issues for small sites or blog but if you have a very wide site then it can happen to you.
Suppose it happens with you then click on any issue which Search Console will list with all the URLs and their respective issues along them. Then you can update them according to the issue Search Console has displayed.
 |
| HTML Improvements |
Sitelinks:
 |
| Sitelinks |
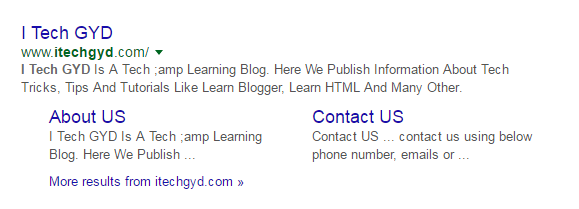
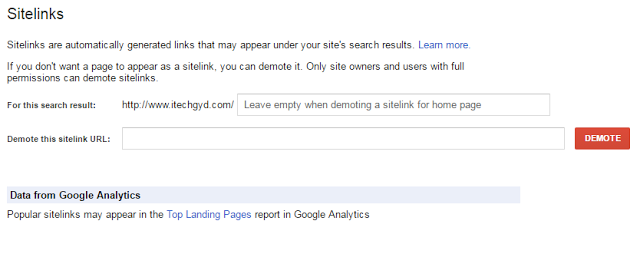
Sitelinks are shown under the main URL or Title of any popular site or brand when you search for that on Google. According to Google Sitelinks are automatically generated links that may appear under your site’s search results. But there is a problem that you cannot add links of your own desire under your site’s results, but don’t worry if your links which you want to show as Sitelinks are enough popular then these links can be shown automatically, fortunately, if you find any link which you don’t want to show as sitelink for your site then you can request Google to remove these links from Search results as sitelinks.
Click on Sitelinks option from Search Console enter the link in “Demote this sitelink URL” field and click on Demote button, that’s it Google will remove your select sitelink from your site.
 |
| Sitelinks |
Accelerated Mobile Pages:
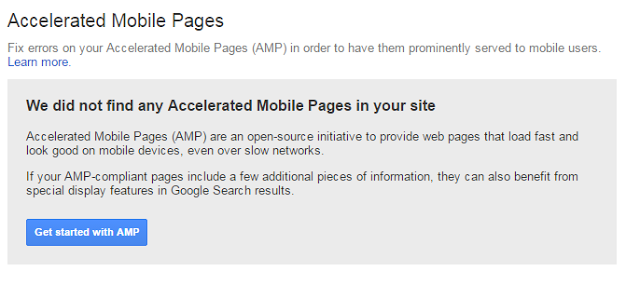
Accelerated Mobile Page (AMP) is Search Console’s service that is used to serve web pages with fast loading speed on mobile devices. Site loading speed on mobile devices is considered an important step for any website as now a day mobile devices are also being used for searching the Google instead of computer devices.
 |
| Accelerated Mobile Pages |
Normally Accelerate Mobile Pages are not used by most of the SEO experts as the default design of their blog theme is also very responsive. That’s why I am also not using this for my own site but if you think you should use it then you can read the Google’s instructions for Accelerated Mobile Pages.
Search Traffic
Search traffic has all the tools which can be used to find the information about your site’s traffic. Such as which sites are linking your site, internal links of your site and Search Analytics etc.
Search Analytics:
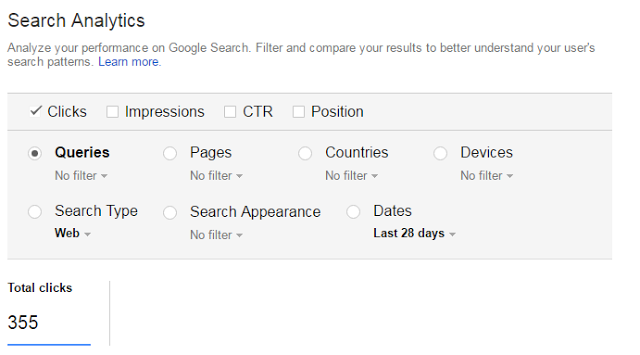
Search Analytics describes you how much traffic you got from the Search Engine Result Page when users clicked your site, how much impressions your site has got, Click through rate (CTR) and average position of your site on SERP besides this you can also find about Queries, Pages, Countries, Devices, Search Type etc.
 |
| Search Analytics |
Google’s algorithm for Search Console and Google Analytics is a little different that’s why the reports of these two services may vary from each other, however, you can look at impression and click through rate to find which pages of your site are showing highest visibility on SERP but low clicks.
Links to your site:
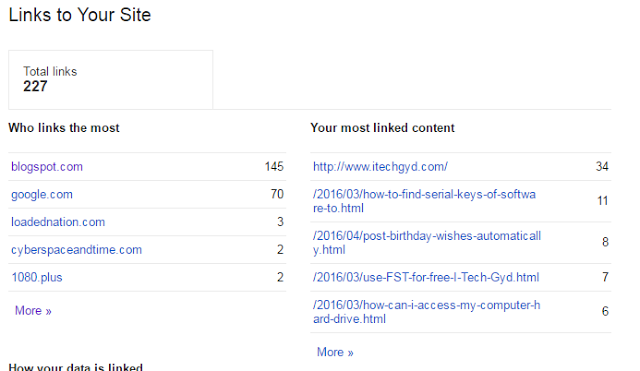
If you want to find which sites are linking your website or its contents the most then head to this section. There are two tabs under this option one is “Who links the most” this tells the URLs of the sites which are mostly linking your site another one is “Your most linked contents” this displays which contents of your website are mostly linked.
 |
| Links to your site |
Internal Links:
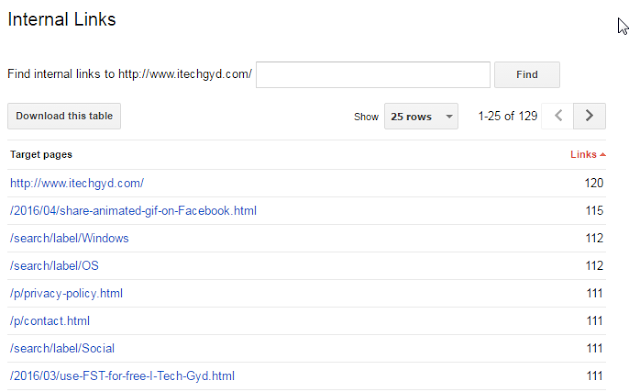
This option tells you about the internal links of your site. You can see how many times a particular link is linked to other pages. Like below picture.
 |
| Internal Links |
Click on any URL listed you can see all the pages which are linking to that particular URL. Your homepage page URL is also listed in this list as the main menu of your site links to your all URLs.
If you want to edit or delete some pages of your site then you must give a look to Internal Links Reports so that you can prevent from broken links.
Manual Actions:
If you violate the Webmaster Quality Guidelines of Google, then Google will notice you by sending a message in the message box and will also provide more information about that error in the Manual Actions option.
Google uses the human reviews to flag your pages if they find anything which is against Google’s Webmasters Guidelines then they can remove your site from the Google search.
The manual action page is used to list all the problems and help you to resolve them. If your site’s ranking has been decreased then you must look at the manual action page there may be some messages from Google for you which can help you to resolve the problem.
There are two types of actions which are displayed in Manual Action page.
- Site-wide matches: This lists all the actions which can affect your whole site.
- Partial Matches: This lists the actions which may affect your individual URLs.
International Targeting:
Google tries to return the best results to their user that’s why there may be a difference between the search results of your country and any other country. For example if you are in Pakistan and you search for “Best Hotels” the results will not match with the results searched in India or USA etc. Google do so by many facts, the biggest way for Google to do so is your domain name, if you are using an international domain name like .org, .com or .net etc. then Google will follow your IP location to determine where you are from. But if you are using any country domain like .pk, .in, .if or .ie etc. then it’s easy for Google to determine that you are from a specific country so Google easily targets your audience.
But if you want to target your audience in a specific country or state then Go to the International targeting page click on Country tab select the country where you want to target your audience.
Mobile Usability:
Since last few years, the number of internet users on Mobile devices has been increased too much, with the increasing of mobile devices internet is also being used on the mobile devices that’s why mobile phones are mostly used to search the web and open the interested sites instead of computers. So your website should be mobile friendly and fully responsive if your site is not mobile-friendly or responsive then Search console will show mobile errors in the Mobile Usability page. If you are have created your blog on Blogger then you can install mobile responsive templates on your blog this will reduce the chances of such errors for your site.
Google Index
In Google Index you can find how many pages of your site have been indexed, mostly used keywords of your site, block resources and the removed URLs of your site.
Index Status:
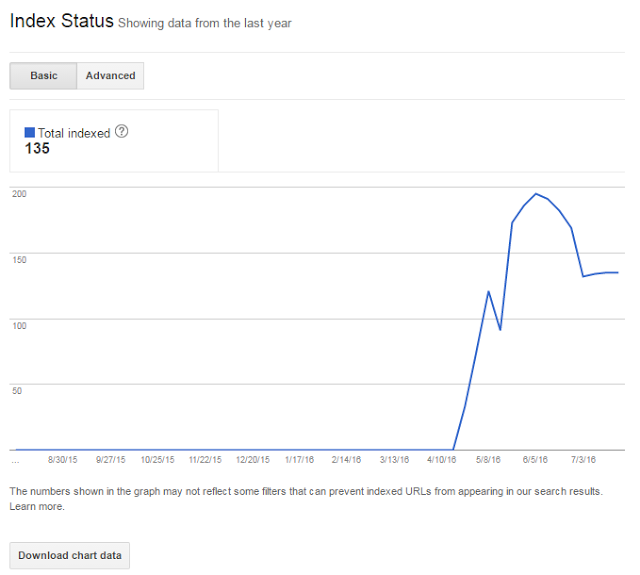
This page displays the number of all the index links to your site which have been indexed in Google’s index. You can also see how many pages of your site have been blocked by Robots and the URLs which you have blocked. Removed or blocked URLs will not be shown on the list, however, total number of pages can be displayed.
 |
| Index Status |
Content Keywords:
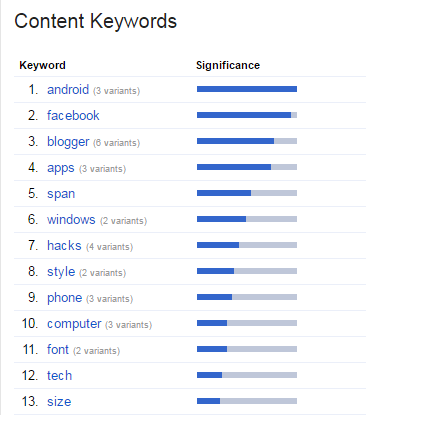
Content keywords show the most frequently used keywords of your site. These are found which Google bots last time crawl your site.
 |
| Content Keywords |
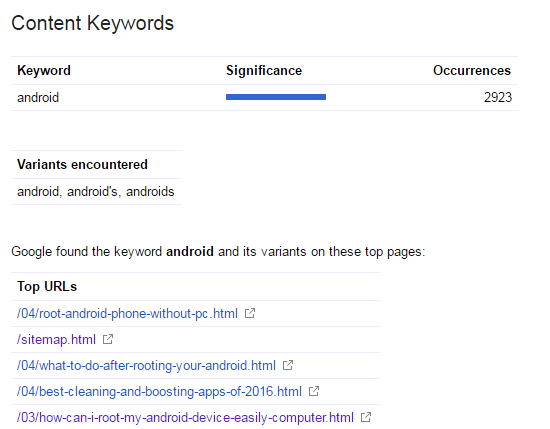
Now click on any keyword from the list, you will see a line graph which represents the density of that particular keyword next to it is the total number of the existence of that keyword, you can also see the different variations of that keyword. For example, I click on Android it displays Android’s and Androids as the variation.
 |
| Content Keywords |
Below is the list of top pages of your site where that particular link was found the most.
Blocked Resources:
Blocked Resources page is for displaying any type of pages, images, CSS, JavaScripts or any other kind of link blocked by your robots.txt file or due to any reason which Google bots cannot access.
Search Console also provides the solution to resolve that particular blocked resource found on your site.
Remove URLs:
 |
| Remove URLs |
If you found any URL of your site in Google Search Results but you are not intended to display that URL in the search result then you can also block that particular URL from displaying in the Google Search Results. First, you have to block the URL using a robots.txt file so that Google cannot index that page again.
To hide the URL just click on Temporarily hide button and enter the URL which you want to hide, in the next step select either you want to remove the page from search results or from the cache and that’s it.
Be Careful while removing any URLs it can also remove any directory if your make any mistake, it takes up to 6 hours to remove the URL, but the time can be changed.
Crawl
Basically, the word “Crawl” mean following any path.
But here is Search Counsel “Crawl” or “Crawling” mean following your links. When Google bots crawl your site they not only following only one page, in fact, your all linked pages are also followed. This is also the one reason for creating a Site Map page of your site.
Crawl Errors:
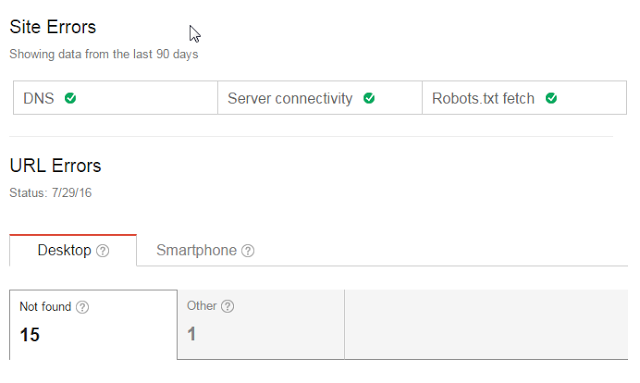
After learning about Crawl, it will be clear for you what is Crawl Error. But I am describing it again, Crawl Error mean those error which Google bots find on your pages while crawling process. There are two types of Crawling Errors.
 |
| Crawl Errors |
- Site Errors: These errors occur when there is problem with your DNS, Server Connectivity or robots.txt file that’s why there are three different columns for all of them click any of them to see if Googlebots have encountered any error for that particular field.
- URL Errors: This error occurs when Google bots want to track a URL but that URL does not exist anymore. For example, if you remove or rename any existing (indexed) URL of your any page and Google bots want to visit on that page then a 404 error page will be displayed which mean URL errors. You can redirect your all URL Error to your Site Map page, this will not produce the chances of URL Errors.
Crawl Status:
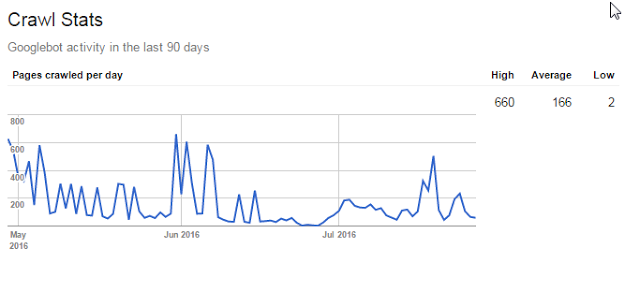
This page shows the status of crawling of your website for last 90 days, the reports for downloading of pages and downloaded size is also displayed in Kilobytes.
 |
| Crawl Status |
The reports displayed on this page are not very important for the SEO of your site, but if any chart drops down suddenly, then you should search for the reason for the drop down of lines, perhaps this is not mandatory.
Fetch as Google:
Fetch as Google is designed to display the crawled URLs of your site so that you can see how Google looks a particular page of your site. Moreover, it is the quick and perfect way to get your links crawled and indexed by Google bots.
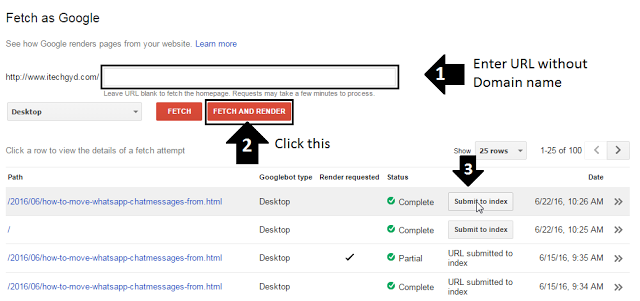
Just submit your URL in the respective field and click on Fetch or Fetch and Render button. Wait!
 |
| Fetch as Google |
What is the difference between “Fetch” and “Fetch and Render”?
Well, both of these are very similar but there is a little difference between these two buttons.
- Fetch: When you use “Fetch” button Google quickly crawl the submitted URL and you can see any kind of problems with your link.
- Fetch and Render: When you use the “Fetch and Render” Google does the same instead you can also see how Google looks your linked pages.
If you ask me what you should do which choosing one of the above buttons then I will recommend the “Fetch and Render” so that you can quickly see how Google sees your page so that there is no difference between your visitors and Google bots.
Now when the page is Fetched and Rendered submit it to the Google index so that it can be displayed in Google Search Results.
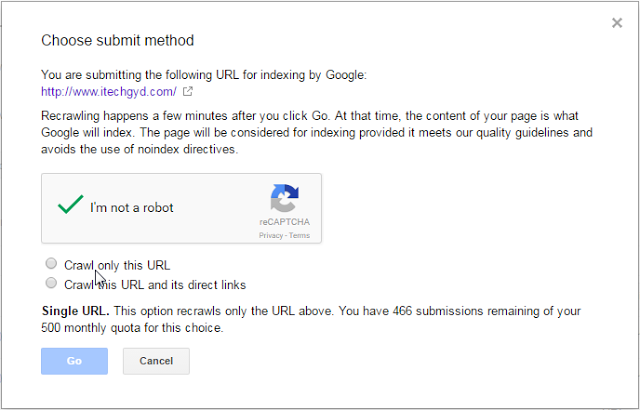
While submitting your URL to index you have further two option these are Crawl only this URL and Crawl this and all its direct URL.
 |
| Fetch as Google |
- When you choose Crawl only this URL only the selected URL is crawled. You can submit 500 URLs per month.
- When you choose Crawl this and all its direct URLs the select and all the direct links of submitted URLs are also crawled. You can submit 10 URLs per month.
Now click on any URL have status as Partial you will see two tabs one is Crawling other is Rendering, select the Rendering there you will see how your visitors see your pages.
Robots.txt Tester:
In our previous article we have already discussed a lot about robots.txt files but here I am again describing it. A robots.txt file is used to give instruction to the crawlers for crawling your site, it contains some instruction that crawlers understand and work according to the instruction given. For example, you have a page on your site and you don’t want to show that in Search Results then you have three conditions, i) Delete the page, ii) Set password on page iii) Block that page from search engine’s access. Blocking page for crawlers is the easiest and best way as most of the website services do not provide the facility of a password and you may not be wanted to delete pages of your site. But there is also a problem, it is not important that robots.txt file will definitely remove your requested pages from all search results web crawlers like Google bot listed to the robots.txt file it is also possible any other crawler do not use this technique to block pages or they don’t understand this method. But you need not worry all the reputed crawls listed to the robots.txt files.
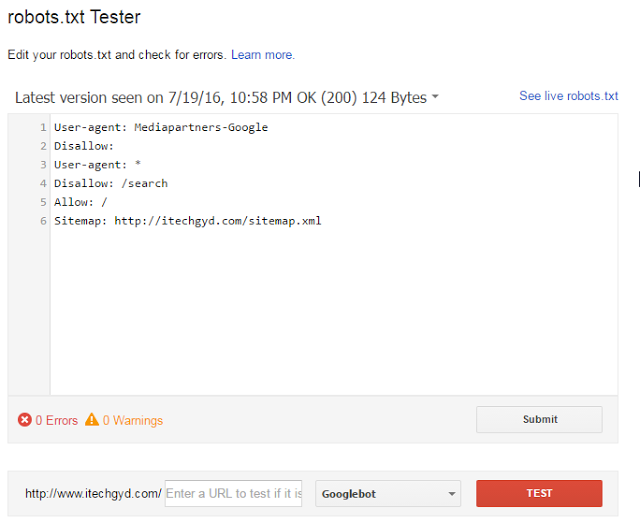
Click on Robots.txt testes option under the crawl. Robots.txt tester page will load here you can test the URLs, edit the robots.txt file and find any error in your robots.txt file.
 |
| Robots.txt Tester |
If you want to edit the robots.txt file then you can also do this directly in the tester. You can enter the name of any crawler you wish to allow or disallow. You can also check the URLs according to your robots.txt file, for example, you have blocked a URL but not sure has the Google bots also stop following that URL or not then enter the URL in the below field and click on the test button. You can also select the bot type from the drop down.
When you have updated the Robots.txt file click on submit button and download the new robots.txt file upload that file to the root directory of your site and verify the update of robots.txt file in your Search Console property.
Sitemaps:
Submitting sitemap to your Search Console property and all the related information has already been described on the top of this page.
URL Parameters:
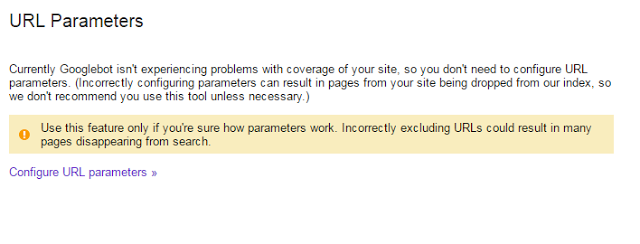
URL Parameters are used to indicate the parameter you use on your site. For example, you have a global shopping site then how can you distinguish the same product in different countries, you can use the country parameters to help Google understand which page should it index for which country. In this way, duplicated pages are not indexed and your pages keep their ranking.
 |
| URL Parameters |
If you want to know how can you set URL Parameters for your site then Google has a complete article on this topic: https://support.google.com/webmasters/answer/6080550?hl=en
After the introduction of canonical tags, the need of URL Parameters page on Search Console has been decreased a lot, however, they are not completely removed.
Security Issues:
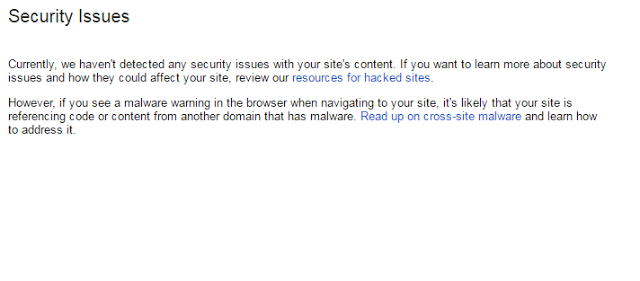
Any kind of issues which Google may find with your site are listed here with the complete resolving method. These issues included the hacked sites, malware affected sites etc.
 |
| Security Issues |
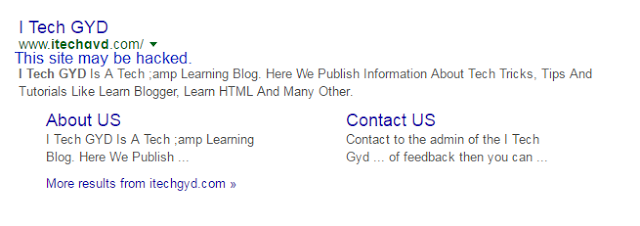
Security issues are also listed in the Search results if they are detected like below image.
 |
| Security Issues |
Other Resources:
Other resources page includes some other tools which are not present in search console which you can use for doing different tasks, such as page speed insights is used to check the page loading speed. Look at the tools if you want them.
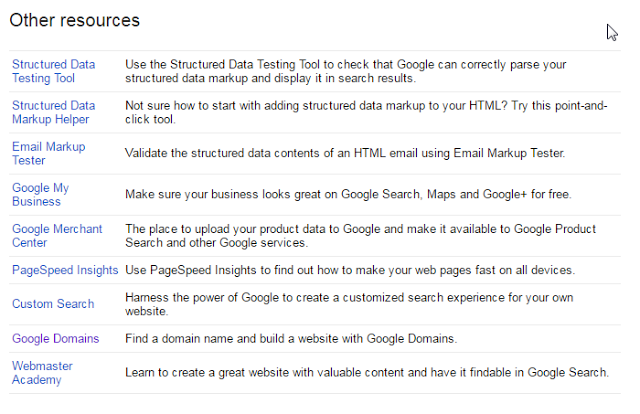 |
| Other Resources |
Final Words
Google search console is best in SEO and for all sites. It tells you that how you can rank your site according to Google’s policy. Many people don’t know that this tool can help them to rank their site in Google but that’ true. Google tells you that what issues your site is facing and how you can sort out these issues easily. Keep in mind that you have added your site to Webmasters tools because if you don’t, Google can’t track your site and unable to tell you anything. So, it is must to connect your site with this tool.
We explain each and every feature of it, which will help you to understand your site with Google’s eye. Connecting your site with this tool tell Google that what your site is about and helps Google to crawl your site in better way. You have to read this guide carefully. Only then you can learn the art of this tool. I am sure that if you learn it, you learn everything because this tool tells you everything which can rank your site to search engine.
So at the end, we suggest you to must use it in your every site and track your site with it. I am sure this tool will definitely tell you your site issues and also it will provide you the solution. We hope you’ll appreciate our efforts which we had done for you. Share this post with your all friends and let them also help to use this tool in their site. You can ask any question in the comment section. We’ll try to response you as soon as possible. So good luck and share this knowledge.
More from my site
Hi. This is Faizan Gul. I am an Engineering Student and tech enthusiast. I love to practice new things and then write about them. In this blog, i would be writing about how to tech guides, tricks and tips and Tech Gadgets Reviews.


Leave a Reply
Want to join the discussion?Feel free to contribute!